Tuesday, March 16, 2010

Technobabe...this loafs for you...

 I know, I know...I just crack myself up.

  This recipe is for a honey oatmeal bread that I make regularly in my bread machine. Now, I love  making bread the old way, mixing and kneading and punching down the dough...but since I've started making all our bread and not buying any, I use the bread machine and save the old fashioned way for specialty breads.


 I am notorious for adding extras to recipes like this. I have started using a white whole wheat flour made by Eagle Mills. It has 4 1/2 times the fiber of regular wheat flour and 30 grams of whole grain per serving.  When I make this bread, I add vital wheat gluten and milled flaxseed. Sometimes I add extra wheat germ.,  just because I can.  I also use  Hodgsons Mills yeast specially for use with whole grains. I  pay extra attention to the bread as it's mixing, and if it looks dry to me (because I have added so much extra stuff!) then I add a bit more water.  The more times you make bread the more you'll understand the process.

 I have some very dark honey from the bees we kept in North Carolina and I always use that in my bread. I also sea salt and real butter. Make sure you understand one thing about yeast, and you'll never lose another loaf of bread again. Believe me, I have baked a lot of bricks in my career..cold does not kill yeast. Too hot will kill yeast. I use hot tap water that I have run for a bit, and it's about the right temperature. Especially once I pour it into that cold metal bread pan!

 Put these ingredients in the order shown into the pan of your bread machine.


 Here are the ingredients:

1 1/2 cups + 3 tbsp. hot water
2 Tbsp. butter
2 Tbsp. honey
3 1/2 cups flour
1 cup oatmeal (quick or old fashioned-doesn't matter. NOT instant!!)
2 Tbsp. dry milk
1 1/2 tsp. salt
2 tbsp. vital wheat gluten
1/4 cup milled flax seed
1 packet yeast


Make a well in the center, pushing the dry ingredients into the corners and put in the  yeast.

  Lock the pan into the bread machine, program it for the 2 lb. loaf, medium crust and whole wheat setting. Press start and you're on your way !!


   This is one of the best breads for slicing for sandwiches, which is one reason I make it. The Irishman does love his sandwiches at lunch. It keeps well, and that may be because of the honey, which (as I'm sure you know) has antibacterial properties.  It's hearty and nutty flavored and everyone that tries it, likes it. It has a beautiful crumb, fine texture.


  Either that, or they're afraid to tell me.  LOL


Bon Apetit !!

Sunday, March 14, 2010

Irish Soda Bread

This was one easy recipe.  And the end result was lovely, with a fine crumb. I took a loaf to the Corned Beef and Cabbage St Patrick's meeting last night, and it was a hit. They ate every piece I took! I have to admit that I left about 4 pieces home for the Irishman...and that was after he ate 3 pieces.  lol   He told me this morning that a guy came in the door of the meeting last night and said --"Hey! I heard that somebody brought Irish Soda
Bread !! My grandmother used to make that all the time ! Is there any left???"  And he got the last piece, cooing over it and the real butter that I brought to slather on it.

  This recipe is made with buttermilk and the end result is beautiful.


  Here's the ingredients list:

4 cups all purpose flour
4 tablespoons white sugar
1 teaspoon baking soda
1 tablespoon baking powder
1/2 teaspoon salt
1/2 cup butter, softened
1 cup buttermilk
1 egg
[1/4 cup butter, melted]
[1/4 cup buttermilk]

*********************

Preheat the oven to 375 degrees R. (190 degrees C)   Lightly grease a  large baking sheet.

In a large bowl,  mix together the flour, sugar, baking soda, baking powder, salt and  butter. Mix well. Stir in 1 cup buttermilk and 1 egg. Again mix it as well as you can.

 Turn this out onto a barely floured surface and knead slightly. It won't be real smooth or shiny, but it will form a nice ball.  Form the dough into a  mound and put on the greased baking sheet.  Using a sharp knife, cut a large X into the top of the loaf.

 Now, mix together the melted butter and buttermilk and brush the loaf with this mixture.  You'll have a bit of the mixture left over, and about every 15 minutes, pull the loaf out of the oven and brush some more on it. Right at the end, the last basting, I also sprinkle some white sugar on the top...just to make it prettier.

  Bake the loaf in the preheated oven about 45-50 minutes. Insert a toothpick in--if it comes out clean, she's done!  And she's a beaut--

After it cools, it's much easier to slice than when it first comes out of the oven. This makes a huge loaf, enough for about 20 servings (not at my house! lol).  I cut it in half and then half again and make the slices about half an inch thick and 3 inches long.

  This is a great bread to make when you don't have a ton of time...it's about 15 minutes prep and 45 minutes to bake.


 Bon Apetit !!

Monday, February 15, 2010

Now..that's a spicy meatball !!!!


As you may have heard, I threw a surprise Valentine's Day/birthday supper for my husband and about 15 of our closest friends. I decided to make it Italian (the culture of romance, right?)...which included a spaghetti with my favorite marinara (Putanesca) and a big bowl of Aglio e Olio, which is just spaghett dressed in a sauce made of an outrageous number of cloves of fresh garlic sliced very thin, and then sauteed in an equally outrageous amount of olive oil in a cast iron skillet. You have to be very careful with this, as not to scorch the garlic. Then you pour it all over the cooked spaghetti, add about 3/4 of a bunch of fresh chopped parsley, shredded Romano cheese, cracked black pepper and sea salt. Toss and VOILA! I also baked a bunch of bread and made a Trifle for dessert.
But back to the meatballs.

I made (ahead of time) a batch of about 8
dozen meatballs.  I don't use ground beef much anymore, and have experimented a lot with different ways to make meatballs that would actually taste good with no beef in them.  I always try to keep meatballs on hand in my freezer. I make them up, bake them off in the oven until they are about 3/4 done, then pull them out and cool. I put them in ziplock freezer bags (gallon sized)  in nice orderly rows and store them flat in the freezer. You can pull them out and toss into sauce for spaghetti and meatballs, you can make meatball subs (the Irishman's favorite sandwich), or come up with any number of ways to use them as a main dish, like...meatballs and mushroom gravy over either mashed potatoes or rice. They are economical, tasty and a sure fire pleaser.
 

I like to make meatballs by the billions. LOL, just kidding, although I do generally make them about 8-10 dozen at a time. It's a bit of a messy job, and so I like to get it all done and get on with my real life.   Here's the ingredients list:
3 pounds ground turkey
2 pounds bulk sausage
4 eggs
black pepper, garlic powder and salt to taste
oregano (again-how much do you like?)
About 4 cups of smashed crackers
2 medium, sized onions, diced small


Before I go any farther with this, I want to clarify a few things. One--I buy a good quality pork sausage made by our little local grocer. The turkey I buy is just the frozen 1 pound chubs of whatever I find on sale. But the sausage is important, so make sure you like the one you're buying, unless you make your own--(my 2010 summer project).

  The other thing is this: I am terrible about measuring spices and such in recipes like this. I know that I like lots of garlic and black pepper, so I use good amounts of these. I know that I am sensitive to salt, so I use less of it. Remember that some spices diminish with freezing, and take note of that. Basil and Oregano both stand up relatively well, although basil can get bitter. I use my own organically grown dried basil, and I know what's there. I am on my last gallon sized bag of it that I grew over 5 years ago, and it's still wonderful. Always crush it between your palms as you add it to your food...


ANYWAY.
lol

Mix the ingredients, with your bare hands (okay--you can wear gloves. I always just take off my wedding rings and jump in up to my elbows.)  Mix them up really well in a big bowl.  If the mixture feels too dry, add another egg. If it's too wet, add some more crackers. [Side note here:  I used to always use oatmeal in them  like I do in meatloaf. I did it like this because my mother did. Everybody has their own idea about this.  But one time, I had had a couple of parties and had several boxes of opened crackers of different kinds and well..I hate wasting stuff if I can find somewhere to use it. So, I took all those stale crackers, put  'em in a bag and rolled them to smithereens with my rolling pin.  The resulting difference in the meatballs was remarkable. Now I try to always have crackers and use them.]

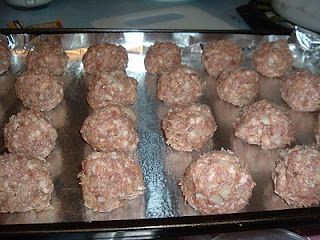
Once your meatballs are all mixed up, it's time for the fun part. I use a small ice cream scoop to measure mine. It makes the meatballs a good size for the subs and they are very manageable. So, scoop some out, wet your hand s a little, and start rolling them around clockwise in your palms.  If you cup your hands just a little, it will make a perfectly round meatball. The picture above shows you a cookie sheet with about 2 dozen meatballs on it, all ready for the oven.  I line the baking sheet with foil and spray with canola spray. There's very little fat from the turkey and pork sausage and the mess is minimal.  I only bake one sheet at a time, as my oven is a little cranky and I want them all cooked evenly. Middle rack at about 350 degrees. It takes about 15 minutes or so is all.


   Below is the finished product.


  This picture looks a little darker than they actually are, but you get the idea. After they cool, bag and freeze.


Bon Apetit!

Saturday, February 6, 2010

Spinach Quiche Alsace Lorraine


 I laughingly call this quiche  Spinach Quiche Alsace Lorraine, because it has spinach, onions and bacon in it. Alsace is the onion, and Lorraine is the bacon ingredient, and these names  identify the quiche. I also put whatever else I want in it, because I can.  In the first picture is the crust in the making...a bastardized version of a Pate Brisee. Pate Brisee is traditionally a rich  pastry used with meat pies and such. It resists the sogginess that you often find in meat pies and other dishes with a very moist filling. Most people use a traditional pastry crust for quiche, and I use a combination of the two. I start with a typical crust for pie, but instead of water, I use buttermilk, which makes a richer pie crust. I add some sugar to it to sweeten it up, and then I crush a tablespoon or so of aromatic dried basil from my organic garden. Sometimes I add some garlic granules.


 Hmmm.. don't know what's going on here (the new blogspot editor, perhaps?)  It won't let me move the pictures so I can write between them,.  Arrgghh....


 I laughingly call this quiche  Spinach Quiche Alsace Lorraine, because it has spinach, onions and bacon in it. Alsace is the onion, and Lorraine is the bacon ingredient, and these names  identify the quiche. I also put whatever else I want in it, because I can.  In the first picture is the crust in the making...a bastardized version of a pate fraise. Pate Fraise is traditionally a rich sweet dough used with custards and such. Most people use a traditional pastry crust for quiche, and I use a combination of the two. I start with a typical crust for pie, but instead of water, I use buttermilk, which makes a richer pie crust. I add some sugar to it to sweeten it up, and then I crush a tablespoon or so of aromatic dried basil from my organic garden. Sometimes I add some garlic granules. Then I mix it up and add just a tad more buttermilk than the recipe calls for. It makes a softer dough and I then pat it into the pie pan. This is easier that rolling the crust out and it makes for a nice crust.  You can see my fingerprints all over the bottom in the second picture.  Then take a fork and  prick the crust, bottom and sides, thoroughly.   In another bowl, break 4 eggs. Before you mix these up, take a pastry brush and brush your pie crust with egg whites.  This prevents a soggy crust and makes the top edges of the crust nice to look at as well. 


  The next thing you need to do is scald 2 cups of milk. After it's scalded, put it aside and mix up your eggs in the bowl. (Do you like my antique beater? I LOVE this one, and use it all the time.!) This third photo is the little darling. To your egg mixture, add about a half teaspoon of salt, half teaspoon of nutmeg, and a quarter tsp. of white pepper.  Mix well.  Add the scalded milk to the egg mixture and beat away.


  In a heavy skillet (I always use cast iron) saute half an onion and about 4 pieces of bacon that has been cut into small bits.  Add some minced garlic if you like.  While this stuff is cooking, chop about 4 cups of fresh spinach. No need to cut it too much as it will cook down nicely. I also like to use sun dried tomatoes in my quiche, as they impart a lovely sweetness. Not a lot, and dice them up well if you use them. The ones I use are packed in olive oil, and I squeeze them out before cutting. Put this and the spinach into the skillet with the bacon and onion and stir until the spinach starts to cook down. Then turn off the fire and get back to the crust.  It's time to put the spinach mixture into the pie pan, spread it around evenly.  Next put the cheese on top.  Most quiche is made with Swiss cheese. I make it with whatever I happen to have. This time I used a combination of colby/jack shredded cheese and shredded romano.  The romano gave it a nice subtle bite and the shredded cheese melts really well. If you use Swiss, cut the pieces as small as possible, as in my experience it's not one of the most easily meltable cheeses. Now pour your egg and milk mixture over the top of it all.  Then it's into the oven at 375 degrees for about 45 minutes. 


  I always serve it with a salad. It's a wonderful supper and uses up some eggs and is high in proteins and you can never go wrong with spinach.  We like it at our house, especially as the leftovers make an easily transportable breakfast or lunch food.  It is best served lukewarm, but we like it cold as well.


  Bon Apetit!

Sunday, January 24, 2010

OMG...January's almost over !

This is what's left of an 8x8 square dish of apple crisp I made tonight. It's a lovely dessert, apple crisp. These are some apples from the freezer that we picked with our grandson at a local orchard, a bag of combined Winesaps and something. We wound up with about 65 pounds of apples, I think, and I made apple butter from some and froze some for pies and crisps.

Apple Annie was a nickname bestowed on me by my friend Art. Art died 2 years ago, or was it three now? When we lived in North Carolina, a group of internet friends came to visit us for a weekend, and we took them sightseeing and to a couple of orchards. Art was the New Jersey KING of apple pies. He had retired to the NC coast, and I met him through a group of friends in Florida. He was a delightful little Italian man, who would bring huge homemade lasagnas every time we all got together. They were magnificent! He was the penultimate guest at our house, and he visited regularly. I saw him about 3 weeks before he died, he and his 2 dogs came to visit, and the Irishman took him to a baseball game. He was having a hard time then, it was easy to see that he was ill. He never came to visit empty handed, and this time he brought me a resin Squirrel hide-a-key, and we laughed until we peed when the dogs kept barking at it. Every year, he would make dozens of apple pies and freeze them, so that all he had to do when he wanted one was pull it out of the freezer. Sometimes he ate only apple pie all day, he told me. He bought the freezer boxes from a local bakery. He said baking pies was his hobby.


But, back to AppleAnnie's Apple Crisp!

Fill whatever size pan of apple crisp you need to make with enough sliced apples to fill it heaping full. I NEVER peel apples, but you can do whatever you want. I do, however, wash them thoroughly before I slice them.

Next, sprinkle flour over the slices, stirring as you go to coat the apples. How much flour, you ask? Just enough. Less if it's a small pan, more if it's a 9x13. Probably about half a cup for small and a cup for large. Then sprinkle in a little sugar--not too much, you want to taste the fresh apples, then sprinkle a little cinnamon over it too. Stir it some more to mix it up. Then I slice thin slices of cold butter over the top, dotting it with the slices. And yes, it has to be real butter. None of that plastic gunk, please.

IN a separate bowl, mix up the crisp topping. It is a combination of flouor (I cup), Oatmeal (2 cups), a stick of cold butter sliced into the bowl, about a half cup of brown sugar. Now, mix it like you would for pie dough. Use a pastry blender, if you have one. If not, the same result can be achieved by using 2 butter knives and chopping away . Cut the butter into the other ingredients and add cinnamon as desired. When the mixture is good and crumbly, and in relatiovely small pieces, throw in some pecans or walnuts for good measure. I love a nutty crunch to my crisps. The handful by handful, sprinkle this mixture evenly over the top of your dish of apples. It needs to cover well, but not more than about an inch thick. If you have too much, put it in a container in the fridge where it will keep for weeks and weeks. The stuff I used on this crisp in the picture? I made the topping at Thanksgiving, and my oven went out and I didn't make it. So I put it in the fridge (I rarely throw anything away!), knowing the night would come when I'd ahve a yen for some apple crisp, and an oven that was working. lol

Bake it at about 350 degrees for an hour or so. You'll know when it's done...the house smells heavenly like apples and cinnamon, and the topping on the dessert is...well,...CRISP.


Cooking is not rocket science. In fact, I refuse to believe it's any kind of science at all...more that it's absolute MAGICK!


Bon Apetit!